What is Bounce Rate?
Before we begin, it’s helpful to define what a bounce is – and, by extension, the bounce rate – and what they are meant to measure.
a bounce is when a user visits a website, and then leaves without clicking through to another page
By its traditional definition, a bounce is when a user visits a website, and then leaves without clicking through to another page. The Bounce Rate, then, is the overall percentage of a website’s traffic that “bounced”.
What Does Bounce Rate Measure?
Bounce Rate was created to help measure how engaging a website’s content is. If a user comes to a website, and they are genuinely interested in the site’s content, then tradition dictates they will click through the site and visit multiple pages. So, then, a high bounce rate indicates that users are leaving a website because they didn’t find what they were looking for, or weren’t “engaging” with the website’s content.
Or does it?
A bounce is [actually] when a user visits a website, but then leaves without engaging with the website.
What a Bounce Really is
Here at PlasticBrain, we’ve long thought that the traditional definition of bounce was… flawed. The problem with the original interpretation is that it myopically defines “website engagement” as just page views. While this was ok five or so years ago, there are so many legitimate reasons today that, by the original definition, a user will “bounce” even though they genuinely engaged with the site.
As such, I’d like to present the slightly altered definition that we prefer:
A bounce is when a user visits a website, but then leaves without engaging with the website.
This simple alteration is a total game changer. Let me explain…
What is Website Engagement?
Engagement can mean almost anything, and will vary depending on the type of website, the content, and most importantly the website’s goals. For example:
- A website for a local business might consider engagement as a user filling out a form or calling the business.
- Someone who writes a blog might consider the amount of time a user spends reading their content as engagement.
- A landing page for a particular product might define engagement as a user playing a video or submitting their email address.
The possibilities here are almost endless. The point is that all of these methods of “engagement” would still register as a bounce in the website’s stats. Let’s see how we can fix that.
How To Improve Bounce Rate
At this point, we have all the pieces of the puzzle, we just need to put them together. We now know that engagement can mean many things, so all we have to do is let Google Analytics know what we consider to be engagement. For this example, I’m going to show what I use on my personal blog, MikeEverhart.net: Amount of time spent on a page. This is a good measure of engagement, and will work for just about any type of website.
My blog is in the top 5 search results for many technical topics, and I get plenty of organic search traffic as a result. The problem was, people were Googling for a specific topic, finding my site, spending ample time reading – engaging with – the relevant article, but then “bouncing” after finding the solution to their problem. So, how can we tell Google Analytics that these users engaged with the site, and did not actually bounce? The secret lies within Google Analytics Events.
According to Google, Events are:
user interactions with content that can be tracked independently from a web page or a screen load. Downloads, mobile ad clicks, gadgets, Flash elements, AJAX embedded elements, and video plays are all examples of actions you might want to track as Events.
Events are recorded in Google Analytics by adding a small piece of code to the website’s existing Google Analytics Javascript tracking code:
1 | ga('send', 'event', [eventCategory], [eventAction], [eventLabel], [eventValue], [fieldsObject]); |
To track time spent on a page, I setup my Events like this:
- Event Category: Page
- Event Action: Engagement
- Event Label: # minutes on page
Which gives us:
1 | ga('send', 'event', 'Page', 'Engagement', '1 minute on page'); |
Now, the thing about Events is that they’re meant to be programmatically triggered. That is, code is usually added to trigger the event when certain actions are taken by the user, such as clicking a button or playing a video. Since we’re not tracking any actual user interaction, other than the time spent on a page, we have to get a little creative. So, we wrap the Event tracking code in a Javascript setTimeout, which will only execute after a specific amount of time we set.
The following code will trigger the Event 60 seconds after the page has loaded. Note that Javascript uses milliseconds here, so you’ll need to multiply the number of seconds by 1000. 1 minute, or 60 seconds, becomes 60000:
1 | setTimeout("ga('send', 'event', 'Page', 'Engagement', '1 minute on page')", 60000); |
I like to extend this a bit to track 5 and 10 minutes spent on the page. The Bounce Rate isn’t affected after the first Event, but these provide some interesting data points, nonetheless (and you can never have too many data points!) To make managing the code a little easier, and since we know that 60000 is 1 minute, we can just multiply 60000 by the number of minutes to wait:
1 2 | setTimeout("ga('send', 'event', 'Page', 'Engagement', '5 minutes on page')", 60000*5); setTimeout("ga('send', 'event', 'Page', 'Engagement', '10 minutes on page')", 60000*10); |
The final code will look something like the following. Note that we only added the last three lines of code; the rest is the existing Google Analytics tracking code.
1 2 3 4 5 6 7 8 9 10 11 12 13 14 15 | <script> // Original Google Analytics Code (function(i,s,o,g,r,a,m){i['GoogleAnalyticsObject']=r;i[r]=i[r]||function(){ (i[r].q=i[r].q||[]).push(arguments)},i[r].l=1*new Date();a=s.createElement(o), m=s.getElementsByTagName(o)[0];a.async=1;a.src=g;m.parentNode.insertBefore(a,m) })(window,document,'script','//www.google-analytics.com/analytics.js','ga'); ga('create', '### Google Analytics ID ###', 'auto'); ga('send', 'pageview'); // Trigger events after N minutes setTimeout("ga('send', 'event', 'Page', 'Engagement', '1 minute on page')", 60000); setTimeout("ga('send', 'event', 'Page', 'Engagement', '5 minutes on page')", 60000*5); setTimeout("ga('send', 'event', 'Page', 'Engagement', '10 minutes on page')", 60000*10); </script> |
The Results
Finally, let’s see some data! I implemented this method on two completely different sites, and after only one week the results were rather impressive. One site’s Bounce Rate decreased 35%, from 76% to 50%. The other site decreased a staggering 65%, from 90% to 32%.

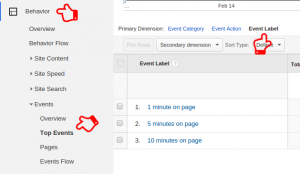
And here’s what the Event data looks like in Google Analytics.

 To access this data in Google Analytics, go to Behavior → Events → Top Events, and then choose Event Label as the report’s Primary Dimension:
Wrapping Up (and Shameless Plug)
I’ve demonstrated, hopefully in a somewhat coherent manner, how to drastically lower a website’s Bounce Rate just by adding a few lines of code. And, as a side effect, you now have more data points with which you can measure website engagement.
Here at PlasticBrain Media, we offer a wide range of fully managed IT services. If you are uncomfortable implementing the methods that you’ve read about here yourself, our SEO experts will be happy to help you! Give us a call at 901-500-9265 or drop us a line today to see how we can help you.
